
Contents
- 1 Easy Sourdough Bread Recipe
- 2 Why This Sourdough Bread Recipe Works
- 3 What You’ll Need
- 4 The Most Important Step
- 5 How to Feed Your Starter (1:1:1 Ratio)
- 6 Sourdough Bread Ingredients
- 7 How To Make Sourdough Bread
- 8 Variations
- 9 After Baking: What to Do with Leftover Starter
- 10 Ways To Enjoy Sourdough Bread
- 11 Sourdough Discard Recipes Coming Soon!
- 12 Sourdough Bread Recipe
This easy sourdough bread recipe is perfect for beginners—no autolyse, no lamination folds, just simple steps and delicious results. Here’s the perfect sourdough bread I’ve been making every week!
Easy Sourdough Bread Recipe
Baking sourdough can seem kind of intense. Between all the fancy terms, special equipment, and long timelines, it’s easy to feel like you need a baking degree just to get started. That’s exactly why I wanted to share this easy sourdough recipe I use every week that my family loves!
Why This Sourdough Bread Recipe Works

I first started making sourdough bread in 2020 when Melissa from Bless This Mess sent me some sourdough starter. Since then, I picked it back up again and I’ve been baking sourdough for my family every week and promised I’d share how I do it. Truthfully, I held off for a while because I’m not a professional baker—but this method has been completely foolproof. It makes perfect sourdough bread every time, and it’s simple and beginner-friendly:
- No Complicated Tools Needed: You don’t need a fancy proofing basket, dough whisk, or baking stone. A regular bowl, towel, and Dutch oven work just fine.
- Straightforward Timeline: There’s no confusing autolyse step or split day process. You mix the dough, give it some love with a few stretch-and-folds, let it rise, shape it, and then stick it in the fridge. Done.
- Cold Proof for Better Results (and Flexibility): Letting your dough rise overnight in the fridge not only improves flavor and crumb—it also gives you more control over your baking schedule. You can shape at night and bake in the morning, without rushing.
- No Starter Guesswork: I walk you through how to feed and time your starter so you’re not guessing whether it’s ready to use. That step alone can take the mystery out of sourdough for beginners.
If you make this homemade sourdough bread recipe, I would love to see it. Tag me in your photos or videos on Instagram, TikTok, or Facebook. And be sure to join the Skinnytaste Community to see what everyone’s cooking!

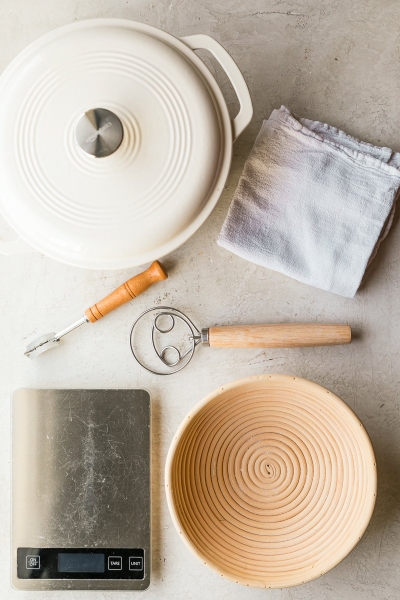
What You’ll Need
- A digital kitchen scale (optional, but highly recommended for accuracy)
- A large mixing bowl
- A Dutch oven or heavy-lidded pot
- Parchment paper
- A banneton basket (you can also use a mixing bowl and kitchen towel)
- A razor, sharp knife, or lame for scoring
The Most Important Step
You don’t need expert skills, just a little time and patience. The most important step? Start with a strong, active sourdough starter. You can make this from scratch (lots of recipes online) or buy it fresh and ready to use (I linked 2 options). Once you have that, the rest falls into place, and I’ll walk you through it, step by step.
How to Feed Your Starter (1:1:1 Ratio)
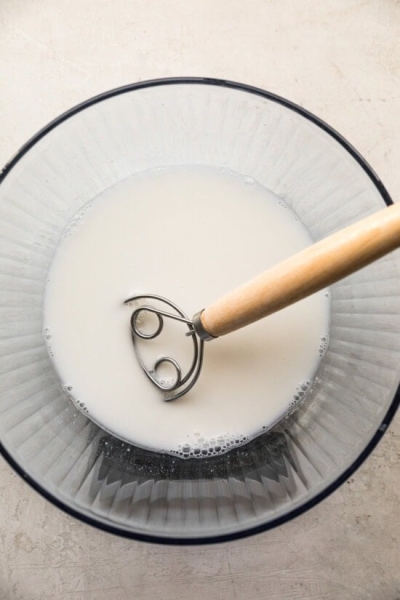
A strong, active starter is key to great sourdough bread! Feeding your starter is simple using the 1:1:1 ratio—equal parts starter, flour, and water by weight. Since I bake 2 breads at a time, I feed it 100 grams of each. You can feed it other ratios, but this will rise the quickest. Feed it early in the morning, and it’s ready to make dough in the evening.
- Weigh your starter: Put 100g of starter in a clean jar and refrigerate use for discard recipes.
- To the jar add 10g warm filtered water and 100g organic all purpose flour (I use organic King Arthur flour, not bread bread flour).
- Mix well until smooth and no dry flour remains.
- Cover loosely with fabric or even a paper towel so it breathes and let it sit at room temperature in a warm spot until it doubles in size, looks bubbly, and smells pleasantly tangy—usually within 4–6 hours if kept in a warm spot.
- You can scale up or down as needed—just keep the amounts equal. For example, 50g starter + 50g flour + 50g water = 150g total starter.
Sourdough Bread Ingredients
This Sourdough bread recipe is made with just 4 ingredients. Here’s what you’ll need to make it. See the recipe card below for exact measurements:
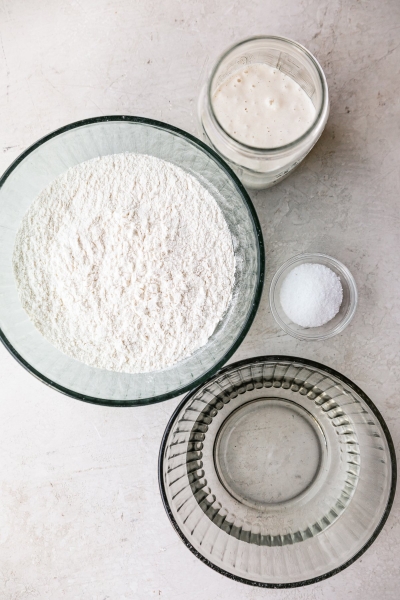
- Ripe bubbly active starter that has been fed and has doubled in size. If you don’t have a sourdough starter, this is the recipe I used, but you can also buy it pre-made here which is easier and quicker to get started.
- Warm filtered water
- Bread flour, or all purpose flour, I prefer organic King Arthur Bread Flour
- Kosher salt or fine sea salt (I love to use pink Himalayan sea salt)
How To Make Sourdough Bread
Here’s the step-by-step instructions for making this foolproof sourdough bread recipe. This will make one loaf of sourdough. Scale it up for multiple loaves. See printable directions in the recipe card below.
1. Feed Your Starter:
Start the day before if your starter is in the fridge. I take mine out the night before and feed it. Then in the morning (around 6 a.m.), I discard and feed it again using a 1:1:1 ratio with warm filtered water. Once it doubles in size and looks nice and bubbly, it’s ready to use—usually by early afternoon.
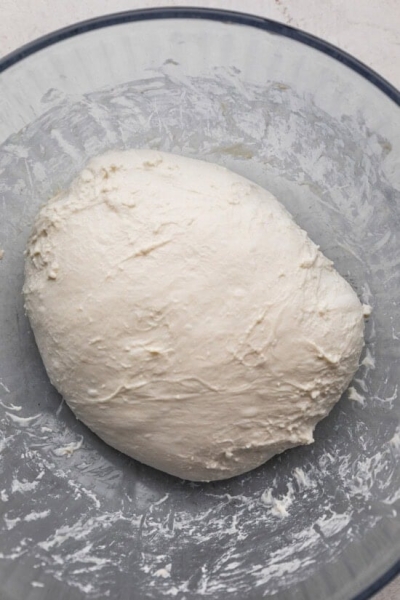
2. Make the Dough:
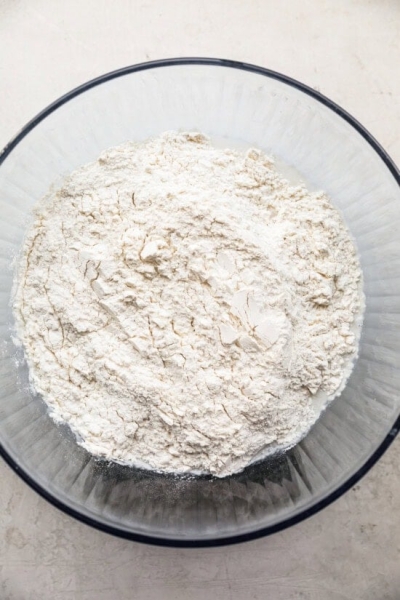
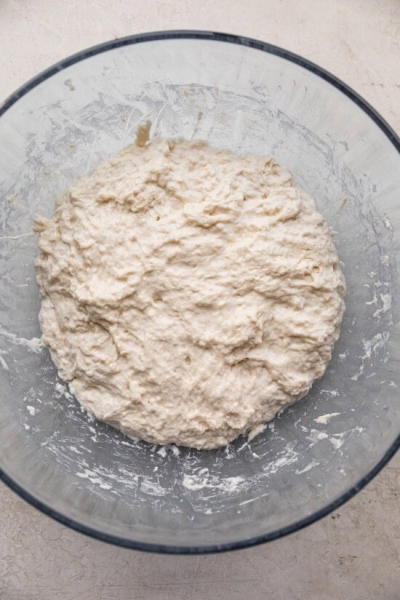
In a large bowl, mix together the active starter, warm water, and salt until well combined. Add the flour and mix until you have a shaggy, sticky dough, the dough will feel sticky. Don’t worry if it looks a bit rough at first! Cover the bowl with a damp towel and let it rest for 30 minutes at room temperature.
3. Stretch and Folds:
After 30 minutes, wet your hand and gently stretch and fold the dough by pulling one side up and folding it into the center. Rotate the bowl and repeat this 4–5 times until the dough starts to come together. Cover and let rest for another 30 minutes. Repeat this process 3 more times (every 30 minutes). If you’re short on time, two rounds will still give great results.
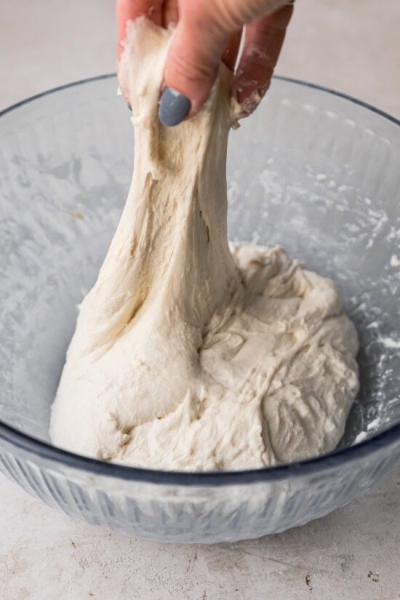
Perform a series of stretches and folds every 30 minutes, 4 times total.
After the last stretch and fold, cover and let it rise (bulk fermentation).
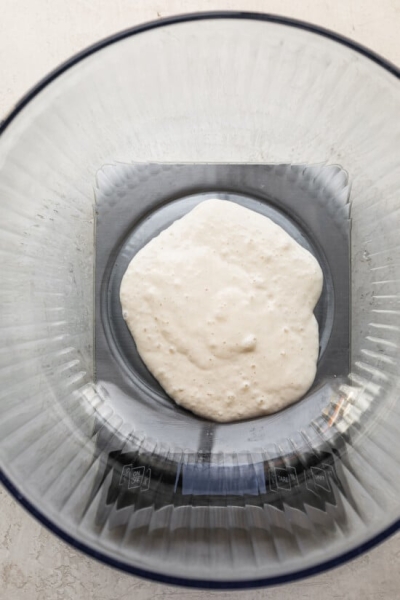
4. Bulk Fermentation (First Rise)
After your final fold, cover the bowl and let the dough rise for 6–7 hours at room temperature (longer in cooler temps). The dough is ready when it has grown by 50–70%, has visible bubbles, and gently jiggles when you shake the bowl.
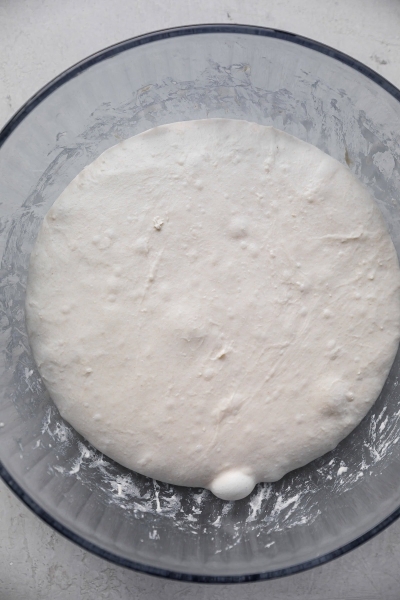
This is how it should appear after the bulk fermentation.
5. Pre-Shape:
Turn the dough out onto a clean, lightly floured work surface. Gently shape it into a round by folding the edges into the center, rotating the dough as you go. Let the dough rest uncovered for 15 to 30 minutes (this is called a bench rest). Use your hands to gently pull the dough toward you to create surface tension and a tighter round shape.

Pre-shape, bench rest and shape the dough

Place in floured bread proofing basket.
6. Final Shaping:
Dust a proofing basket or medium mixing bowl (lined with a floured towel) generously with flour. You can also spray the bowl with cooking spray and dust with flour as an alternative. Fold the dough into itself again, rotating as you go, then place it smooth side down into the bowl. Cover with a towel, shower cap, or plastic wrap.
7. Cold Fermentation (Second Rise):
Refrigerate the dough overnight, or for up to 24 hours. This cold proof improves both the flavor and texture—and it gives you a flexible baking schedule (highly recommend). Want to bake the same day? Let the dough rest at room temp for 1–2 hours until it looks puffy.
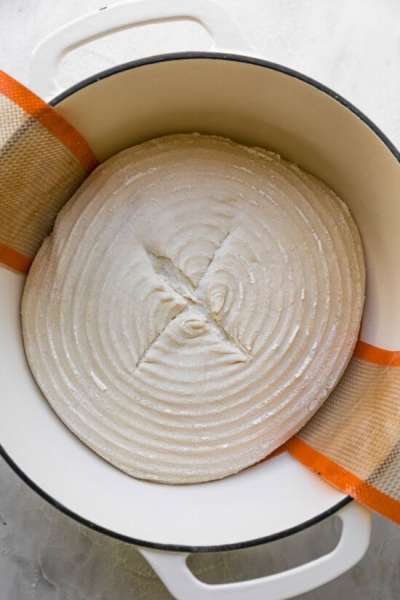
Score the dough and bake in a 450F preheated oven, in a Dutch oven with the lid on 30 minutes .
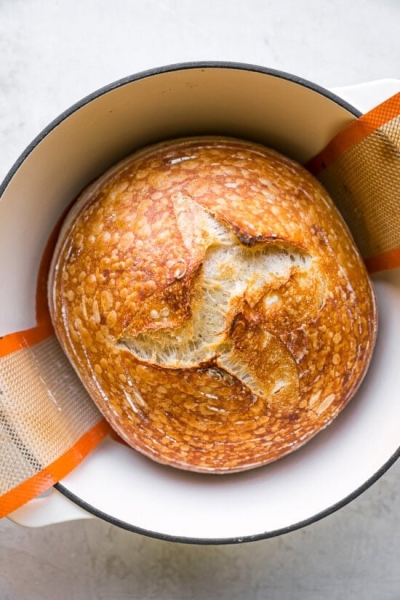
Remove the lid, reduce temp to 400F and bake 25 to 30 minutes.
8. Bake:
- Preheat your oven to 450°F. Some people do this with their Dutch oven inside but I don’t because my crust burns on the bottom. Every oven is different.
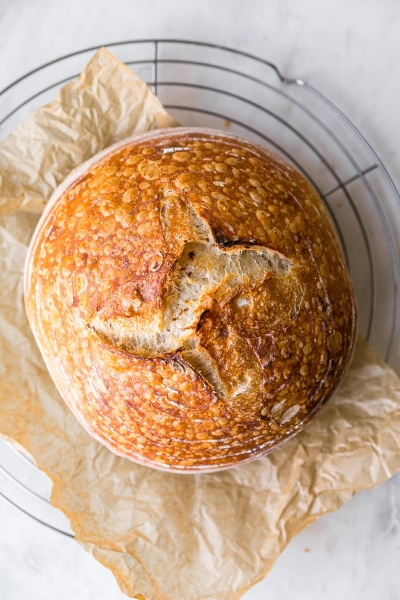
- Cut a piece of parchment to fit the size of your pot. Gently flip the dough onto the parchment (I place the paper on a plate, invert the bowl on top, and flip carefully). Score the top of the dough with a razor, lame, or sharp knife. I usually do a simple “X,” but feel free to get creative.
- Use the parchment to lift the dough into the Dutch oven. Cover and bake for 30 minutes.
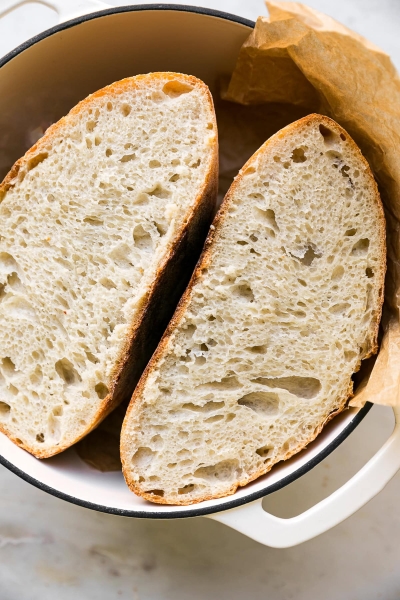
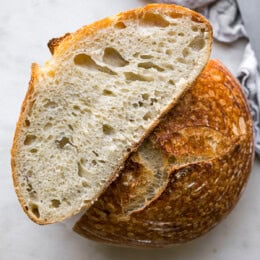
- Then remove the lid, lower the oven temp to 400°F, and bake for another 25–30 minutes, until the crust is deep golden brown and sounds hollow when tapped. Cool on a wire rack for at least 1 hour before slicing.
Variations
Once you master baking sourdough, play around with different flours like whole wheat flour or whole grain flours.
After Baking: What to Do with Leftover Starter
If you’re not baking again the next day:
- Keep 25g of your starter
- Feed it 50g flour + 50g water
- Let it sit out for 1–2 hours, then store in the fridge, covered
- If you are baking the next day, just leave your newly fed starter at room temp overnight and repeat the feeding cycle.
Ways To Enjoy Sourdough Bread
My favorite way to eat it is when it’s fresh out of the oven, still warm with a little butter – there’s nothing is better! Leftover bread we toast and make avocado toast, mushroom toast, breakfast BLT, grilled cheese sandwiches, tuna sandwiches… the possibilities are endless!

Sourdough Discard Recipes Coming Soon!
Sourdough Bread Recipe
2 Cals:72 Protein:2.5 Carbs:15 Fiber:0.5 This easy sourdough bread recipe is perfect for beginners—no autolyse, no lamination folds, just simple steps and delicious results. Here’s the perfect sourdough bread I’ve been making every week! Course: Breakfast Cuisine: American
Prep: 4 hours hrsCook: 1 hour hrrest time: 1 day dTotal: 1 day d 5 hours hrs Print Rate Pin Save Saved! WW Points Yield: 28 slices Serving Size: 1 ounce 1x2x3x
Ingredients
- 50 to 100 grams ripe bubbly active starter, ¼ cup to ½ cups (I use 100 grams)*
- 350 to 375 grams warm water, I use 375 grams, less in the summer when it’s humid
- 500 grams bread flour, or all purpose flour (4 cups plus 2 tbsp) I prefer organic King Arthur Bread Flour
- 10 to 12 grams fine sea salt, I use pink Himalayan sea salt
Instructions
- Feed Your Starter: The day that you'd like to make your dough, feed your starter. If it was in the refrigerator I take mine out the night before and feed it. Then in the morning before I plan to make my dough or at least a few hours before I discard and feed it again. Your starter will be ready to use when it is at its doubled in size before it starts to shrink back down in size.
- Make The Dough: To make your bread dough, add your active sourdough starter to a large mixing bowl with water and salt and mix with a spoon to combine well. Add the bread flour and mix together until a wet and sticky dough forms and the ingredients are full combined. Cover the bowl with a damp kitchen towel, and let rest 30 minutes at room temperature.
- Stretches and Folds: After the dough has rested 30 minutes, use a wet hand to gently pull the corner of the dough near the side of the bowl and push it down into the middle of the bowl. Repeat this series, rotating round the bowl, until the dough starts to look like bread dough and comes together in more of a ball. This should take about a minute of going round the bowl 4 to 5 times pulling and tucking into the center. Let the dough rest, covered for 30 minutes. You will do this 3 more times every 30 minutes, covering after each time for a total of 2 hours, if time permits. If you don’t have the time, you can do this twice, it will still turn out just fine.
- Rest (Bulk Fermentation): After the series of stretches, cover the dough with a damp kitchen towel and a lid or plate so it doesn’t dry out and let it rise for 6 to 7 hours at room temperature, or up to 8 to 9 hours in colder temps. This is known as the bulk rise. The dough is ready when it has increased by 50% to 70% volume, jiggles when you shake the bowl and has some scattered bubbles visible on the sides and top.
- Pre-shape: Tip the bowl upside down, allowing the dough to fall on a clean lightly floured surface. Gently shape it into a round by folding the top down to the center, rotate the dough; repeat until you’ve come full circle, if you have a bench scraper, tuck the edges of the dough into the center and work around the edges to create tension.
- Bench Rest: Flip the ball dough over. Let it rest for 30 minutes. Using your hands, gently pull the dough ball towards you, letting its grip on the counter pull it into a tighter ball. Rotate the dough slightly and repeat around the edges until you've formed a tight ball.
- Shaping: Meanwhile, prepare a bread proofing basket by dusting it very well with flour, or you can use a medium mixing bowl (about 8 inches across) and line it with a clean towel and dust it very well with flour. Alternatively, if you don’t want to use a kitchen towel you can prepare the mixing bowl by generously spraying it with cooking spray and then flour very well. Going around in a circle, fold the top down to the center, rotate the dough; repeat until you’ve come full circle. Place your dough ball, smooth top down, into your prepare basket or bowl, and cover with a shower cap, plastic wrap or towel.
- Cold Fermentation (second rise): Refrigerate overnight or as long as 18 to 24 hours. If you want to bake the same day, let the dough rest for 1 to 2 hours, at room temperature, or until it's spread out a bit and looks puffy. (Note: I prefer the cold proof method and refrigerate this overnight for a lighter and airier crumb.)
- Baking: Preheat the oven to 450° F. Cut a piece of parchment paper to fit the size of your Dutch oven.
- Gently turn your bread dough out onto a piece of parchment paper (I like to put my parchment paper on top of a plate, put the paper and plate on top of my bread basket, and turn it over gently).
- Using the tip of a razor blade, exacto knife, a lame, or even a sharp serrated knife, score the top of the dough however you wish – I usually go with a simple “X”. But feel free to get fancy. Use the corners of the parchment paper to carefully transfer the dough into your dutch oven. Place the lid on the dutch oven.
- Place the dutch oven in the center of the hot oven and bake 450°F for 30 minutes. Remove the lid, lower the oven temp to 400°F and put the dutch oven back in the oven, uncovered, for another 20 to 30 minutes. The bread should be browned all over and sound hollow when tapped when it is done or reaches an internal temp of 205–210°F.
- Remove the pan from the oven, and then transfer the bread to a wire rack and let it cool at least 1 hour before slicing and serving.
Notes
*Since my starter is in the refrigerator, I take it out and let it get to room temperature before I discard and feed it. For a strong starter, I personally like to feed it the night before when I take it out of the fridge, then in the early am discard and feed it again 1:1:1 ratio with warm water, keeping it in a warm spot. Once that doubles in size, I make my dough in the late afternoon, then shape it at night so I can refrigerate overnight. Then it’s ready to bake the next morning. Sourdough bread is best eaten the day of, though it will stay fresh if covered room temperature up to 3 days in an airtight plastic bag or container. You can also refrigerate it for at least 1 week or wrap it tight and freeze it for up to 3 months. To freeze, slice it after you let the loaf cool completely, then wrap it well in plastic wrap. Let it thaw at room temperature a few minutes when ready to eat, then toast. After I make my dough, to “refresh” my starter, I simple feed it. I’ll keep 25 grams of the leftover starter and mix it with 50 grams of water and 50 grams of flour by weight. If I’m baking tomorrow, I’ll just leave it on the counter. If I’m not baking again the next day, I’ll store it covered in the fridge until I’m ready to bake again. My bread weighs about 28 oz using 100 g starter. Nutritional info is based on that, for 1 ounce slices. Feel free to eat as much as you wish. This recipe is adapted from Alexandra Cooks and Bless This Mess.
Nutrition
Serving: 1 ounce, Calories: 72 kcal, Carbohydrates: 15 g, Protein: 2.5 g, Sodium: 138 mg, Fiber: 0.5 g